I really need to be less shouty about it. It's not like this is the 80's or anything, and big collars and shoulder-pads are the rage any more. Still, Vorlons have impressive collars (which may or may not match the cuffs - you'll have to e-mail me if you want to know more about that), collars that'd make Ming the Merciless green(er) with envy, so maybe it was worth shouting about. But I'm getting off-track and I've only just started.
So where to start when building a Vorlon encounter suit? I'd had a number of conflicting thoughts as to how I was going to build the thing, and was unsure as to how I was going to build the actual frame. Was I going to wear the collar as an actual collar, balanced on some sort of shoulder harness? Was I going to make it a free-standing structure that I'd carry around instead? Or would I do something else. I didn't know. So I decided to just get on with building it and let necessity guide my hand. In retrospect I would've come up with something different, but hindsight's a wonderful thing, and I'm famed for dallying for ages. I needed to get on with something, so I did, and started on the collar.
Now I know that there are at least a thousand better ways of doing this, and given more time and more money I would've done things differently. A properly-welded, lightweight aluminium frame would've made a great skeleton for an encounter suit. But I had neither the skills nor the materials nor the tools to create such a thing. So I started with... a hula hoop.
 |
| One hula hoop, slightly bent |
I had no idea how difficult it would be to buy a hula hoop in January. But apparently they're "seasonal" toys. Who knew?
Anyway, once I'd found a relatively-sturdy hoop, I bent it into roughly the right shape, and then reinforced the shape (for the short term) with gaffer tape. Gaffer tape's going to play a massive role in this project, by the way. So if you're somehow allergic... stop reading now.
 |
| Stopping things from moving since ... actually, who knows? |
That was the very basic skeleton, but I now needed something to pad it out. Something lightweight and flexible but sturdy. Luckily I had an old foam mattress lying around, which after destroying my spine and then spending several years under the stairs was no longer good for its original purpose. So I started chopping it into pieces that I'd be able to use to wrap around the skeleton and give the collar some bulk.
 |
| Chopping a foam mattress with a kitchen knife - not the best of ideas... |
Of course those pieces were too long, so I chopped them again to be the right length. Once the pieces were the right size, I wrapped them around the hoop and secured them in place with a little gaffer tape, as so:
 |
| Encounter suits - well insulated |
With the foam in place I was happy with the rough shape of the collar that I had. So I then went and secured it all in place with a LOT of gaffer tape.
 |
| Ambassador Kojak - if the collar fits... |
All told, I think I used nearly 200 metres' worth of gaffer tape making this costume. I try not to think about that. Luckily I'd also managed to estimate the size of the hoop that I'd need quite nicely, and with all the foam on this collar was the perfect size. (I won't provide actual measurements here - if you're building your own encounter suit you'll probably want to tailor it for your own height and needs, anyway.)
Happy with the size of the collar, I then decided just to build up the inside of the collar a little more, in order to actually match the real thing.
 |
| Yet more foam and tape |
When I was satisfied that this had added the correct amount of bulk I then - yes, you've guessed it - covered the all of the new bulk with even more gaffer tape. Where would we be without gaffer tape?
 |
| Kinky bondage Kosh |
At this stage it was looking a bit crude, but I knew that once it was done and the details added it would look okay. And all this hadn't actually taken that long - just a couple of hours in a single evening. Fantastic.
What did take a lot of time was this:
 |
| My own, personal hell |
In order to provide a smooth and paintable surface, and also something I could use to build up some detail, I covered the entire thing in papier mache. Conventional wisdom was that I should have built it up to be a few millimetres thick, so that it would be quite sturdy. In the end though, I didn't manage quite that much.
 |
| No wonder I suffered - I managed to infuse the encounter suit with pure, sparkly evil... |
Covering one side of the collar took me the better part of an hour. This meant that covering the entire thing took two hours. But of course I had to wait at least an hour for one side to dry before I could turn it over, so the whole task easily took three hours. Given that amount of time, I only managed four layers of papier mache before I basically ran out of time. If I'd not had a day job or other commitments I could've done more, especially since I had a whole three weeks at the start of the papier mache ordeal. But still, it served.
Once I'd decided that I'd done enough papier mache, it was time to add the details. First of all I started with the little sensor/breathing tubule things on the front of the collar. If you actually examine Ambassador Kosh's costume you'll see that he actually has five of the things (two on each side, one in the centre). I'd always been under the impression that there were only three, though, and it seems that this was the common conception. Given I only needed the costume to be accurate from a distance, and it didn't have to withstand closer scrutiny, I figured that three would do.
 | |
| Yep, I bottled it |
The centre nozzle I made from the bottom of a shampoo bottle, and the two side nozzles were the necks of two-litre bottles of coke or lemonade or whatever fizzy drink it was I had lying around the kitchen and rapidly expiring. With the bottle parts held in place with gaffer tape (of course) I added more detail using papier mache, building up the fleshy parts that surround each nozzle (as will be seen in later pictures).
The observant or those particularly well-versed in Vorlon culture will know that those nozzles are actually recessed into the encounter suit collar. Well... er... I didn't have the time to do anything like that. Given more time I would have built up lips around them, but again, time was not on my side so I just went for capturing the essence of the costume.
With the nozzles in place I moved on to the "exchaust tubes" that poke out the back sides (fnarr) of the collar. Although the actual exhausts are fairly intricate, I once again went for evoking the basic imagery. I'd save up some cardboard tubes from the insides of rolls of wrapping paper, and these were just the right width. So I cut them to shape...
 |
| Yes, I was able to use a sonic screwdrive in the making of this Vorlon encounter suit. Geek heaven. |
...and then simply gaffer taped them in the right position to the collar:
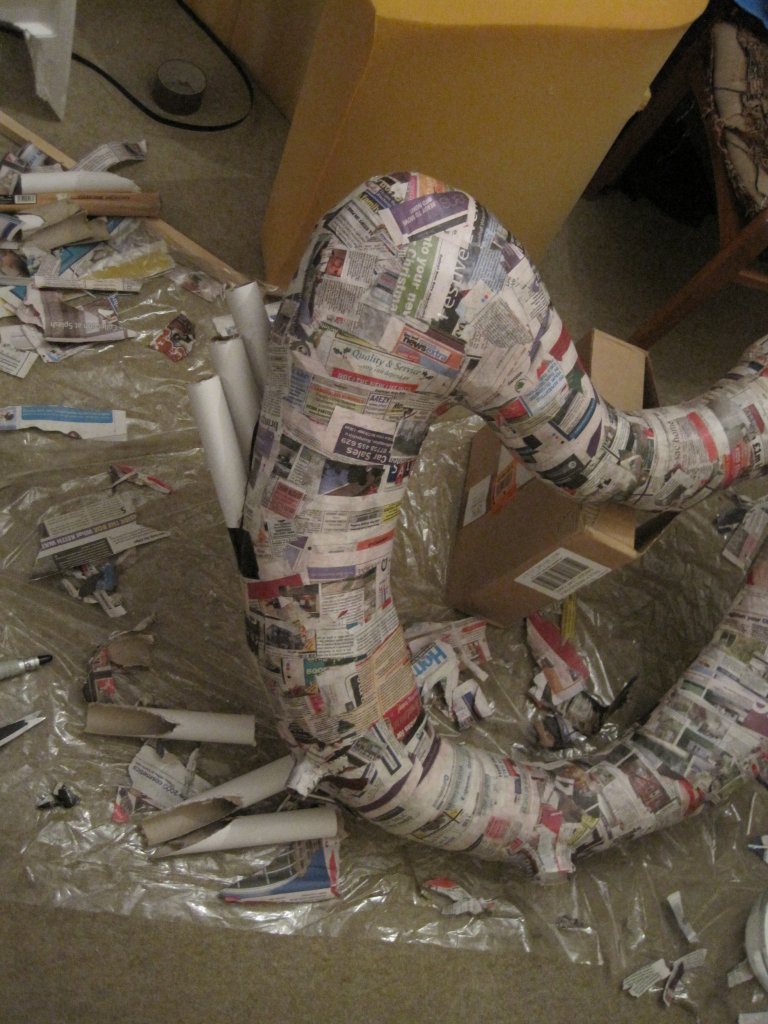 |
| An obsessive-compulsive's nightmare |
This was fairly tricky, in as much as I had to make sure that the tubes were in the same place on each side. With the collar not being exactly symmetrical this wasn't that easy to do.
Once the tubes were in place they, too, were covered in papier mache to allow them to blend into the rest of the collar. (In the above picture you can also see the start of the work on adding detail to the nozzles.)
The final piece of structural detailing that I was going to add to the collar were the green tube things that appear on the side of each shoulder. I initially tried to find some vacuum cleaner tubes that were the right side, but a trip to the tip didn't yield anything suitable (apart from a few funny looks) - most vacuum cleaner tubes are too finely detailed, and have too much ribbing.
Once again I therefore decided that I'd just try to recreate the general sense of that particular piece of detail. And as I was idly peeling off the labels off the remains of the drink bottles I'd mutilated to obtain the nozzles, I hit on just the thing:
 |
| Transparent in its simplicity |
The bottles had little ridges molded into them which, whilst not being quite the same as the actual Vorlon encounter suit (yes, by this point I believe that they're real - you would too) did the job nicely. So I cut a bottle in half, and used one half for each side of the collar. To round of the ends I took the rounded neck off the bottle and cut that in half to make a small dome, which I kind of squised in place to make the right shape. Once I was happy with the position of both bottles (again a lack of accurate symmetry proved to be an issue), I gaffer taped it all into place:
 |
| Of course, photographing transparent objects against a detailed background always works well... |
All that remained was to once again add some papier mache around the join, so that the bottle parts would merge smoothly into the rest of the collar, and I was done!
 |
| All done! Well, apart from everything else... |
By this point I was quite impressed with my efforts. All told, this had taken the best part of two of the three-and-a-bit weeks that I'd had available. Of course, not all of that elapsed time had been spent on the collar - I'd been off sourcing materials for other parts of the project, so I'd not been completely focussed on the collar. But the collar was definitely the most time-consuming part of the whole endeavour.
So now I had a collar! All I needed to do next was make a helmet, paint it, figure out how I was going to wear and carry the suit, and apply the fabrics and other special effects. Simple.
Er.
I had a week and a half left. But, as it turns out, you'll be amazed at what you can achieve in a week and a half...


